Here is an article on transcribing. I got it from a friend in digital form and have no idea who the author is. If anyone knows who wrote it please let me know.
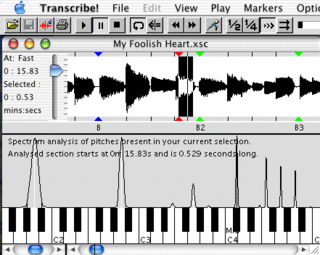
I would add that a great tool for transcribing is the computer program Transcribe!. It allows you to slow down the tune without lowering the pitches. It also allows you to highlight parts of the waveform and it tells you what pitches are in the selection. The demo version will work on the first two tracks. If you are too cheap to buy it just reburn the tracks you want to transcribe to the first or second track of a new CD.
~The "Key" That Unlocks the First Door
Regardless of the nature of your selected project (i.e. solo, chord progression, bass line, melody, horn or string parts, etc..), your highest initial priority must be to determine the "key" of the composition. Discovering the key (G, Bb, Am, etc..) truly unlocks the main door to all probabilities, allowing your ear and mind to work collectively towards your goal.
I hope you like sports, especially "fishing", because that's exactly what you're trying to do in finding the key. More than ninety percent of tunes have a key-oriented nature about them, meaning that there will be one dominating tone for you to discover. The process? Well, it comes easier to some than for others, so don't get frustrated. Be patient. Try to softly hum the note that sounds the most powerful to you, then match it on your instrument. In time you'll get so good at this that it will happen almost immediately, but like anything else in music it takes practice to develop proficiency. One tip: often the "fifth" of a key (G in the key of C) will appear to be the key. If you double-check your suspicion by tracing backwards to one (C), you can verify if, indeed, you've found the most powerful tone or not. And remember that, if you think you might be wrong, you probably are! Stay tuned. Much more to come...
During the first part of this edition of "Coach's Corner" I shared with you my own experiences that eventually led me to begin transcribing music on a day-to-day basis. I also briefly defined what transcription is, and offered some basic guidelines to help you in choosing a potential project to tackle. And lastly, as you recall, we discussed the critical issue of determining exactly what "key" the song or solo might be in. In this chapter we'll move ahead and start covering the entire process in a methodical, step-by-step manner. Ready?
Made A Decision Yet?
Now, the obvious assumption is that you've already decided on a project by this time, and possibly also figured out the key as well. But before we move on, I want to offer some advice regarding the decision itself.
I often remind my students that "success lies in the effort", even though there's often a lot of pain and frustration involved. I'm not about to lie to you. There's inherently a pretty high frustration factor involved with transcription, sometimes to the degree where it keeps a player away from doing it at all (which is a big mistake!). Accept the reality of the situation, and be willing to take whatever you can get. Believe me, what you'll get will be priceless in the long run. To make transcription life a little more bearable, feel free to select more than one project. Remember that this is all a "means to an end", so there's nothing wrong with having a second or third project waiting in the wings when you inevitably run into a "brick wall" with the primary target.
"Highlights" Or The Whole Enchilada?
Take the time, before officially getting "in the trenches", to decide whether you wish to transcribe a project in its entirety, note-for-note, or just in what I like to call "highlight" fashion. This is where, as the name implies, you go shopping for just those "special" moments that stand out for you. I often do this if I'm transcribing riffs from a given artist, especially if they're the type of riffs that can be played in many situations, and not just within the parameters of that particular song. If, however, I'm tackling a melody, chord progression, bass line, or if a solo really fascinates me from beginning to end, I'll go for the whole "enchilada". Again, remember the "means to an end" theory, and the fact that your aim is generally not to play another artist's solo verbatim. It's also easier, in a sense, to tackle a project in "highlight" format, because you can simply "hunt around" looking for those aforementioned "special" moments.
Your Transcribing "Toolbox"
You'll need three essential "tools" to effectively handle a transcribing project: your guitar or bass, a decent tape machine, and later some manuscript paper for getting what you're interpreting into standard notation. The tape unit should ideally be a portable cassette deck with a "half-speed" switch, though in my formative transcribing years I managed to burn-out a couple of nice open-reel machines, just by the sheer amount of pausing and rewinding to listen and verify the accuracy of what I was doing. On the cassette front, Marantz has made the most widely used model for transcribing purposes for many years. Also in vogue nowadays is a number of relatively inexpensive digital samplers, many with the ability to playback at a variety of speeds. The main negative with these, from what I can see, is the fact that you're limited to usually around thirty seconds (give or take ten or fifteen) per sample. It's much nicer to have the full three or four minute track to work with, along with any other projects that you care to squeeze on to a cassette tape.
Step By Step, Inch By Inch...
As you begin the initial stage of transcription (i.e. the "ear" part of the equation), be prepared to do three things with every event that you try to capture. First listen, then hum what you've heard, and finally imitate what you're humming on your instrument. You'll do this over and over again until you're as certain as possible that what you've come up with is the "real" deal, and not some facsimile of something that you've heard before. One huge tip that I can offer is to limit yourself to as few notes as possible, making it much easier to verify your accuracy. Stop after each note, making that pitch the last event that you've given your ear a chance to hear. Tedious? Sure, but it's the only way to get the job done and sharpen your ear.
To recap our most recent chapter, we touched base on several issues that confront the aspiring transcriber. I spoke about bracing yourself for the tough task ahead, whether to tackle all or part of a particular project, the practical "tools" that are required for the job, and finally offered a brief summary of the actual process of listening, humming, then imitating what you're trying to learn. We'll spend this final discourse on how to decipher chord progressions, plus I'll outline some fundamental guidelines on the subject of notation. All set?
The Bass Line Always Rules!
I've expressed my feelings about playing bass many a time in the past, as well as stressing the importance of a bass part from the compositional point of view. Well, guess what? The understanding of what the bass is doing in a transcribing scenario is absolutely critical to your chance of success in breaking down a chord progression, because the bass part holds the singular most important clue: the "root" of the chord.
Nine out of ten times, if the bass is on a C note, the chord in question is a C chord (or A for A, F for F, etc). Learning the root of the chord is priceless information, because it now allows your mind to join in the "detective" hunt.
More Chordal "Clues"
Once you've determined the root by dissecting the bass, there are three remaining clues. First up is the "melody", and by that I mean either the highest voice that you can detect on a chordal instrument (guitar/piano), or the melody of the song itself. When you put the bass clue together with the melody clue, the picture really starts to shape up. For instance, you may arrive at a C chord with a G melody, or an A chord with a C melody, etc. Since chords are generally constructed of three to four tones, at this point you might have half the information that you need! With every new "piece of the puzzle" that you gather, the job becomes increasingly easier.
Next up is the "personality" of the chord in question. Your choices are two: major or minor. Add either the major 3rd (E in a C chord) or minor 3rd (Eb in a C chord) to what you already have (assuming that the melody isn't the 3rd) and take your best shot. It shouldn't require much practice for you to be able to distinguish the difference. Now the final clue to search for I sometimes call the "flavor" of the chord. Is it a 7th? A 6th? A 9th? You might not even need this clue if the music is fairly simple in nature. If not, be prepared to utilize the pieces that you've already collected with some "trial and error" until you find the answer. In time, your ear will relate to what it's heard before, and this entire deductive process will be very quick.
Notation? The "Nickel" Tour
Don't even consider picking up your pencil until you can play what you're going to attempt to notate. And by the way, use a pencil (not a pen) with an "industrial strength" eraser. Accept the fact that you're going to make a lot of mistakes until you get good at this. I sure did!
Do you think that notation is difficult? Let me tell you why it won't be. Besides the obvious fact that everything you do amounts to accumulated time and experience (i.e. "been there - done that"), the truth of the matter is that the most challenging aspect of accurate notation is rhythmic interpretation, an area that is certainly not infinite in the least. Believe me, once you've experienced an 8th note followed by a pair of 16ths even a few times, it becomes "old news". But if you never allow yourself to experience it at all, notation can remain a mystical science for your entire career. Tips? Sure.
Since a lot of your mistakes will stem from inaccurately gauging the value of pitches, write only the "heads" of the notes under lightly penciled vertical "hash" marks that represent the beats of a given measure. Refrain from adding flags, stems, and beams until you can verify your judgment later. If I encounter a "three-note" group as I described above (an 8th note followed by a pair of 16ths), I'll pencil in a small "8" next to the note that I believe to be the eighth. When I return to my transcription "shorthand" later, logic tells me where the stems and beams go.


No comments:
Post a Comment